目标
本篇博客整理自之前学习 Docker 时的笔记,是一个非常好的 Docker 入门练习项目。
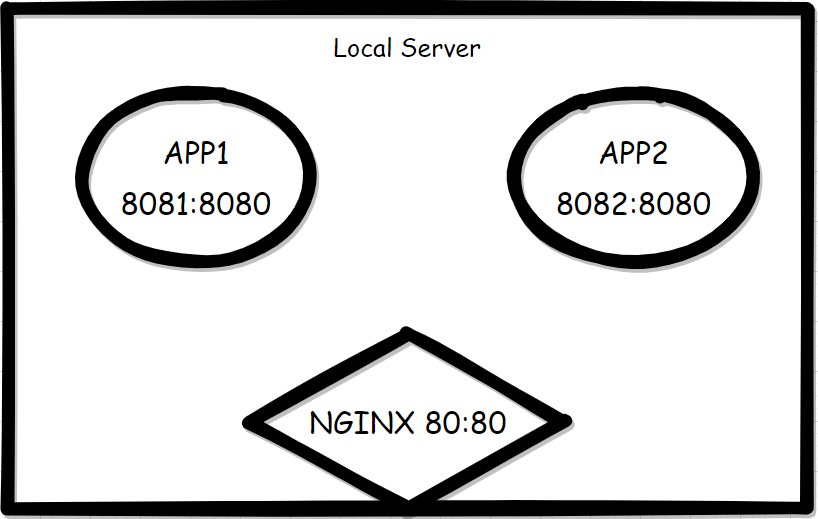
目标非常简单,创建一台本地虚拟机作为实验环境,启动两个 Docker 容器 「APP1」 以及 「APP2」,分别将本地服务器的 8081,8082 端口映射到两个容器中,然后启动一个 Nginx 容器绑定 80 端口对外提供服务,将流量负载均衡到两个容器实例,示例如下图:
Local Server IP 地址:172.17.226.146
APP1 :172.17.226.146:8081
APP2 :172.17.226.146:8082

准备 Docker 环境
本次实验环境基于一台本地的 CentOS 7 虚拟机,先使用 yum 安装 docker
1
2
3
4
5
|
[root@localhost ~]# yum -y install docker
[root@localhost ~]# systemctl enable docker
[root@localhost ~]# systemctl start docker
[root@localhost ~]# docker -v
Docker version 1.13.1, build 0be3e21/1.13.1
|
准备服务器
服务器代码使用 Golang 实现,监听 8080 端口,打印出访问路径,以及 APPNAME 环境变量,用于区分两个容器实例
 1
 2
 3
 4
 5
 6
 7
 8
 9
10
11
12
13
14
15
16
17
|
/* server.go */
package main

import (
    "fmt"
    "net/http"
    "os"
)

func main() {
    http.HandleFunc("/", HelloServer)
    http.ListenAndServe(":8080", nil)
}

func HelloServer(w http.ResponseWriter, r *http.Request) {
    fmt.Fprintf(w, "Hello, %s! 当前访问的服务器是:%s", r.URL.Path[1:],os.Getenv("APPNAME"))
}
|
构建自定义 Docker 镜像
使用 Dockerfile 构建一个 docker 镜像,作为 APP 容器的启动镜像。
小提示
建议将 Dockerfile 置于一个空目录下,并将构建过程中需要的文件复制一份到相同目录,避免因为上下文原因导致构建失败。
1
2
3
4
5
|
[root@localhost ~]# mkdir server
[root@localhost ~]# cd server/
[root@localhost server]# touch Dockerfile
[root@localhost server]# ls
Dockerfile  server.go
|
这里用到了 Dockerfile 几个基本指令
FROM:指定基础镜像,每个 Dockerfile 中必须添加,并且必须是第一条指令;
WORKDIR:指定容器启动时所在的工作目录;
COPY:将当前上下文中的文件拷贝至容器工作目录;
CMD:容器启动时默认执行的命令,如果 Docker 容器使用命令运行,则将忽略默认命令,如果 Dockerfile 具有多个 CMD 指令,则忽略除最后一个 CMD 指令之外的所有指令;
1
2
3
4
5
6
7
8
9
|
# Dockerfile

FROM golang:1.14

WORKDIR /go/src/app

COPY . .

CMD ["go", "run","server.go"]
|
使用 docker build命令构建镜像
 1
 2
 3
 4
 5
 6
 7
 8
 9
10
11
12
13
14
15
16
17
18
19
20
21
|
[root@localhost server]# docker build -t my-golang-app .

Sending build context to Docker daemon 3.072 kB
Step 1/4 : FROM golang:1.14
 ---> 21a5635903d6
Step 2/4 : WORKDIR /go/src/app
 ---> 23e005f31852
Removing intermediate container 2e2a7f025449
Step 3/4 : COPY . .
 ---> 226931b37b30
Removing intermediate container d7b9d9a0378b
Step 4/4 : CMD go run server.go
 ---> Running in 5eb4b3effa34
 ---> d09ab7128593
Removing intermediate container 5eb4b3effa34
Successfully built d09ab7128593

[root@localhost server]# docker images
REPOSITORY          TAG                 IMAGE ID            CREATED             SIZE
my-golang-app       latest              d09ab7128593        25 seconds ago      811 MB
docker.io/golang    1.14                21a5635903d6        7 weeks ago         811 MB
|
准备 NGINX 镜像和配置文件
使用docker pull从仓库中获取最新版的 Nginx 镜像
 1
 2
 3
 4
 5
 6
 7
 8
 9
10
11
12
|
[root@localhost server]# docker pull nginx
Using default tag: latest
Trying to pull repository docker.io/library/nginx ...
latest: Pulling from docker.io/library/nginx
75646c2fb410: Pull complete
6128033c842f: Pull complete
71a81b5270eb: Pull complete
b5fc821c48a1: Pull complete
da3f514a6428: Pull complete
3be359fed358: Pull complete
Digest: sha256:bae781e7f518e0fb02245140c97e6ddc9f5fcf6aecc043dd9d17e33aec81c832
Status: Downloaded newer image for docker.io/nginx:latest
|
准备 nginx 配置文件,需要注意的是 upstream 中的 server 字段 ,不可以使用 localhost,这也是 docker 初学者经常会踩的一个坑,因为 localhost 是相对于当前 Nginx 容器的 localhost,而我们的需求是将流量转发至本地服务器的8081、8082端口,这有一点反直觉。
 1
 2
 3
 4
 5
 6
 7
 8
 9
10
11
12
13
14
15
16
17
18
|
# nginx.conf

events {}

http {
    upstream myapp1 {
        server 172.17.226.146:8081;
        server 172.17.226.146:8082;
    }

    server {
        listen 80;

        location / {
            proxy_pass http://myapp1;
        }
    }
}
|
启动容器
启动 APP1,映射 8081端口,设置环境变量名为 app1
1
|
docker run -d -p 8081:8080 -e APPNAME=app1 my-golang-app
|
启动 APP2,映射 8082 端口,设置环境变量名为 app2
1
|
docker run -d -p 8082:8080 -e APPNAME=app2 my-golang-app
|
启动 Nginx 容器
1
|
docker run -p 80:80 -v /root/server/nginx.conf:/etc/nginx/nginx.conf --name=myNginx -d nginx
|
测试
Nginx 默认使用轮询算法,多次访问本地虚拟机 IP 地址, http://172.17.226.146/world 打印出不同的结果,意味着 Nginx 容器成功将请求分发到不同的服务器,测试成功。


